Sunday, March 28, 2010

Reviving A Lost Orchid


March 28, 2009: This is the orchid that my mom-in-law bought years and years ago.  Problem is, it was not taken cared of when she left for the States.  I will try to revive this plant and see if I can make it bloom.  My first step was to place the plant in running water for 15 minutes.  I wanted to use fresh charcoal, but the roots were firmly attached to the pot.  I opted to just place fresh new ones to fill the container and placed in a spot that is free from direct sunlight.  The aluminum tray is filled with water and the container is suspended on a bed of charcoal.  This is to give a humid environment that will help the plant to revive itself.  

Saturday, March 27, 2010

Getting into the Parsley Challenge


Parsley is a great herb for sauces and salads.  There are two varieties of parsley that you can grow in your garden.  One is the curly leaf parsley, which is great for garnish. And the other one is the Italian flat leaf parsley, which has a stronger, pungent flavor that makes it great for cooking with sauces as well as other dishes.  The one I have here is the flat-leaf variety.  Growing parsley in containers can be relatively easy, but when you are starting with a cultivar such as this one, it can be really challenging.  Among all the plants in the herb garden, this one had less problems when it comes to leaves.  The other plants already had yellowish to golden specks on them, indicating stress as well as pest problems.  The problem with this one is probably over-watering.  The size of my container here is about 6", although it would have been better if I picked one that is at least 8".  For information on how I transplanted my parsley, visit my general gardening section.   
On the 7th day, this is what it looks like.  I trimmed off the less-healthy leaves one by one to encourage growth. Trimming when growing parsley in containers must be done very close to the ground.  This way, you encourage the plant to produce more shoots and produce more foliage.  The problem with parsley is that it takes quite a while before you are able to harvest them.  It takes about 3 months for your plants to produce enough leaves for harvesting.  Care is done by giving the plants 1/3 to 1/2 cup of water every day to keep the soil moist but not wet.  Once the top-soil feels dry, that is the time you give them water until it drains at the bottom.  Never give them too much water as it is easy to give them too much water when growing parsley in containers. I sprayed them with a solution of 1/2 teaspoon fish and seaweed emulsion mixed with 1 liter of water and side dressed the soil with 1/2 cup of the solution.  The instructions in the container said to mix 1 tablespoon of the emulsion with 4 liters of water.  I think I may have prepared a diluted mixture.  Next time I'll try 2/3 of the emulsion to 1 liter of water.  This is to be done every 2 weeks.


March 31, 2010 I had them moved on our roof deck for they are not getting enough direct sunlight at the veranda.  They are growing quite nicely, but I made a mistake of spraying them with fish emulsion.  Some leaves got burned, so I have to space the spraying every 2 weeks when it comes to my parsley.  Since the sun is high, I gave them water until it flows through the drainage holes.  This is the second time it got that much water as I am growing parsley in containers.


April 5, 2010 I went up to take a look at my herb garden and was surprised to find that flowers are starting to form in my parsley.  From what I know, parsley is a biennial, meaning it should produce flowers by the 2nd year.  I have to pinch them out or my parsley will lose its flavor.  Aside from that, the tips are starting to grow brown, so I have to move it again to another location that has the best of the morning sun, but with an afternoon shade.


Oregano: My Joy of The Mountain

If you are just starting your herb garden, or starting on gardening for that matter, then oregano is just the thing for you.  This hardy plant grows in almost all types of conditions, and thrives most when not being showered with too much attention.  Oregano is perfect for container gardening with little attention and care.  The soil requirements for growing oregano in containers is not rocket science. It can grow in almost any type of soil, but grows well in soil that is light, well-drained, alkaline, and low on nutrients.  Exposure to arid conditions can even make this plant grow well, as long as its roots have enough room to grow.   My oregano seedlings came in 3" seedling containers made up of thin plastic.  How I transplanted my oregano is described in my general gardening section.  My daughter was with me and asking questions why I'm breaking down the terracotta pots and why am I making a mess at our living room.  I could not do it outside for even if it was around 3pm in the afternoon, the sun was high and scorching.

The second picture is taken on the 5th day.  The birds were showing interest on them, so I had to protect them in some way.  I still have 2 seedlings in this 6" container.  You should have at least 12" of area for growing oregano in containers, and that is just for one plant.  Time will come that I will eventually have to separate the seedlings of my oregano.  They are already starting to crowd each other in their small world.


This was taken on the 7th day.  They are now starting to be as high as the sticks that I placed around them.  I then made a decision to separate the two oregano plants.  The could barely hold one plant, much less two.


I separated the plants by cutting the smallest one close to the ground as possible.  I did the separation when the sun was not that high and the temperature was not that hot.  I buried the plants up to the level of their first 2 leaves.  This is to give them a lot of space to develop roots.  I did not trim the leaves off as the plant was top-heavy.  If this oregano was bigger, the lower leaves would have been trimmed off to allow a depth of 4 inches for root development.  What's good about oregano is that they can develop roots even without any encouragement.  Just give them enough soil and moisture, and they will grow just fine.

You do not need a lot of fertilizer when growing oregano in containers.  Too much nourishment will give your plants a bitter, acrid taste that makes them not suitable for cooking.  I just sprayed the leaves with seaweed and fish emulsion to protect them from pests.  There is no need to side dress the oregano, spritzing them will be enough.

March 31, 2010  This is what my oregano looks like on its second week.  The leaves are thick, sweet-smelling and starting to become heavy.  The stems are now showing signs of bending because of th weight of the leaves.  I only sprayed them with fish emulsion and no side-dressing.

Friday, March 26, 2010

Fresh, Aromatic Basil Grown in Container Gardening


Basil is a great herb to add in pasta sauces as well as some other Mediterranean dishes. Although I can easily buy basil in dried form, nothing beats the flavor of fresh herbs.

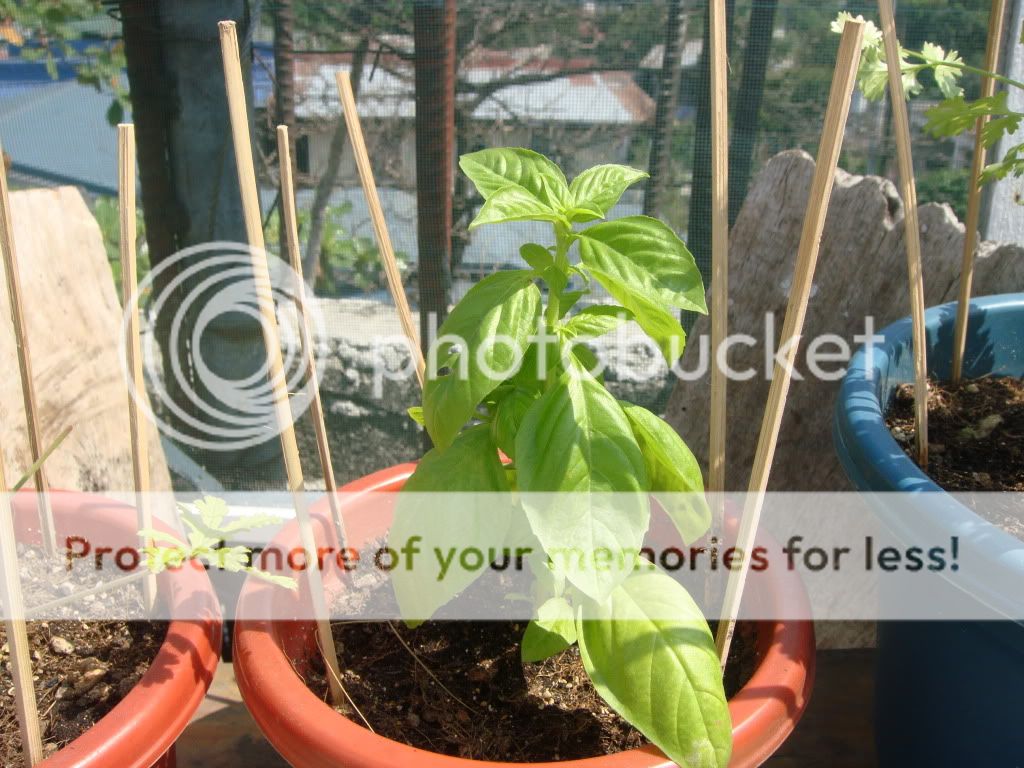
This picture was taken on the first day of transplant.  I do not have the patience to start them from seeds, so I opted to buy a seedling in a local herb garden store.   The container for my basil is sized 6", although it should be around 8" in depth and diameter.  As you can see, there are two seedlings in this container.  Actually, there are 3 of them in there, the smallest one being covered by the large basil at the left.  This was bought at March 17, 2010 at 10am in the morning.  I transplanted the basil at around 3pm when the sun is still high but not that hot enough to cause stress.  The specifics on how I transplanted the basil from its seedling container is described in the general gardening section of this blog site.  I was given a pamphlet for growing basil that briefly describes how to take care of my seedlings.  Basil prefers soil that is rich, light, and drains well with a pH of 5.0-6.0.  Initially, my seedling is around 3 inches tall.

5 days later, I had the uneasy feeling that I should check on my plants as I was preparing for my daughter's graduation party... True enough, I found my plants in a sad state after they were massacred by the local birds.  Notice the leaf of the plant at the right.  The birds made a feast out of them, including the other plants in my container garden.


The leaf on the ground is part of the first pair of true leaves that the birds chomped off.  It still has the beak marks of the birds that wanted a taste of the basil.  Who can blame them, the plant was sweet-smelling and highly enticing for any birds and humans to eat them as they are.


This picture is taken on the 7th day of the transplant.  I kept the soil moist, but not wet by giving the plants deep watering whenever the soil is dry to a depth of 1-2 inches.  This is necessary as the summer sun here is really scorching and you can see the soil getting dry on the next day.  The leaves are now big and the foliage is starting to develop.  It is about 5 inches tall.  The set of leaves of the top will be the last set of vertical leaves.  New ones will have to be pinched to encourage lateral growth.

On the 8th day, I had to force myself to cut the down the other seedling.  They are starting to crowd each other inside their small space.  Basil needs at least 6 inches of land area if you wish to plant them in rows.  A container that is sized 18 inches can hold 2 plants adequately.  I sprayed the leaves with a solution of 1/2 teaspoon seaweed and fish emulsion added to 1 litter of water on the day after the transplant.  It is not a good practice, I know, but I was only able to get my hands on the emulsion that day.  The solution is sprayed on to the leaves until the water droplets start to run down on the leaves.  A cup of the solution is then poured over the soil for nourishment.  Spraying and feeding is to be done every 2 weeks to maintain the health of the soil as well as to prevent the plants from getting sick.

This is the other seedling that I removed from the pot.  I made the mistake of cutting the roots to remove them from the pot.  I had hoped that transplanting them with some roots attached will help them grow.  I also sprayed them with a solution of seaweed and fish emulsion.  I hope it will thrive soon enough.  Removing this basil was not an easy decision to make...  I plan to place a tray of chives at the along with the plants to discourage green flies that damage the leaves.


March 27, 2010, 9am in the morning.  Now, this shows promise.  My basil is now standing slightly straight, and the tops are no longer touching the protective screen that I placed around it.  It still does not look much, but this is already a huge improvement from the past couple of days.  The other plant is already established and producing shoots nicely.  This weak one had a week's worth of delayed development because of lack of roots.

March 31, 2010: It is now the second week of the initial transplant.  My  basil plants are growing nicely.  I had to sacrifice personal comfort for they were only getting up to 4 hours of direct sunlight on the veranda.  They are now located on the flower box placed on the roof deck of my husband's house.  The one in the blue-green pot is the original plant in its original soil.  This one at the right was the sad-looking plant that was separated on March 27.  I had to spray them again with fish emulsion for the amount of sun they are getting is more than what they usually.  It's a good thing that the weather is cooperating as the sky is overcast for the last couple of days.


April 5, 2010 There was a problem with the 2nd basil transplant.  For some reason, the old leaves started to dry up and turn yellow.  I do not now what to do, so I decided to just leave them be.  The new leaves are still green and growing.  I'm thinking of giving them a dose of fish emulsion on Wednesday if things do not go well.  New leaves are starting to grow, even between the old branches.  I pinched off the top new leaves to encourage lateral growth.  I then had an idea to plant the pinched branches to see if the cuttings will start to grow.  Let's wait and see what will happen.  The soil was made of clay, and I experimented by mixing about a liter of sand to make it loose.  This will not be an organic herb for I had to prepare the soil with Osmocote 14-14-14 slow-release pellets.

April 7, 2010  Sadly I would not know how this experiment with the cutting will turn out because the local birds made a feast out of it...... Which is a good thing for I've read that I did the procedure wrong.  I'll do another cutting next week and see how it will turn out.


Part of this article can be seen in growing basil in containers, hosted by Ezine Articles.


All About My Herb Garden


Ever since I started writing articles about gardening, I wanted to create a garden of my own.  The problem is the limit of land area in my area.  Thanks to the this gardening assignment given to me by my oDesk buyer, I was able to come up with the solution for my dilemma: container gardening.  Containers of at least 8 inches must be used for the herbs to promote growth.  I also had to purchase a potting mix for I could not use just any soil that I can find around my area.  Diseases and pests that live in the soil will be a major problem.  Buying a potting mix will eliminate the need to prepare the soil with hazardous chemicals such as fungicides and herbicides just to kill microorganisms and weeds that may compete with the plants for nutrients.

With the help of my sister-in-law and her husband, we were able to visit the local garden store.  The place was full of seedlings that had my head reeling.  I had so many choices, I did not know what to pick first for my garden.  I did not have my camera then, but the selection was really extensive.  Almost a hundred herbs were available for the picking.  The seedlings were sold originally for Php 50.00 per plant, but since my sister-in-law was a member, we were able to get the seedlings for Php 100 for 3 pieces.  I was able to buy basil, oregano, parsley, rosemary, lavander, and malvarosa for my starting herb garden.  They were planted in a thin seedling container of 3 inches.

I was able to get my hands on two sizes of containers.  One set was at least 6 inches depth and diameter, while the other was around 4 inches.  We were in a hurry so I was not that very particular in checking the size, which was of course a mistake.  The multipurpose potting mix I bought already had compost in it.  It was about the quarter of a size of a full sack of rice, and good enough for 4 pieces of 6-inch and 4-inch containers with a lot to spare.

Before placing the seedlings inside the containers, I had to collect broken terra cotta pots in the house.  Fortunately I was able to find a lot of them.  I broke them into little pieces and lined the bottom of the plastic containers.  This will help drain the soil as plants can easily drown in container gardening.  I then placed potting mix at the bottom and dug a hole slightly bigger than the container that my seedlings came in.  The seedlings had to be held by the leaves and pulled gently from the plastic container.  I placed the seedling inside the hole and covered it with additional potting mix.  I watered the plants until it flowed out of the bottom and placed them on the veranda.

The plants were bought last March 17, 2010.  As long as I have time to spare, I will record their progress to see how they are fairing.  So far, they are doing good.  hopefully, it will continue on.